|
|
timbo
Junior Member

Posts: 74 
|
Post by timbo on Oct 2, 2014 16:34:01 GMT -5
Then drew round the pattern and cut out on my old band saw.  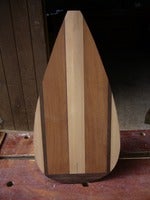 Next I will sand down the shaft and glue on the blade. Before that though there are hedges to cut and trees that are blocking out the light to our garden to prune back hard. I’m not into cold weather so I’m starting a bit early as there is a lot to do. On the up side it will produce some ash logs for the wood burner which should be good to go next year. Keeps me off the streets I guess and I will continue to do all these jobs as long as I can to help keep fit, etc. Catch you all soon, good paddling to those of you lucky enough to have the weather for it and good building to the others who are not quite there yet. |
|
|
|
Post by jensen1031 on Oct 3, 2014 9:28:54 GMT -5
looks awesome Timbo. Would be interested where you found the oval shape for the blade or if this sisomething that you just hand drew. Also interest in the angle that you attached the balde to the shaft.
|
|
timbo
Junior Member
Posts: 74
|
Post by timbo on Oct 4, 2014 4:49:41 GMT -5
There you go Jensen - copied from something I found and saved in a word document. Unfortunately I can't remember where I found the original - sorry!
You can use the table of offsets below to make a blade that is 16 3/8” tall and 8 1/2” wide. To use the offsets start by taking a piece of paper and draw a straight line from top to bottom down it’s center (the “center line”). Then draw another line perpendicular to the center line, about an inch up from the bottom of the paper (the “bottom line”). This line should go all the way across the bottom of the paper. Mark the center line at one inch intervals from 0 to 17 starting with zero at the intersection of the center line and the bottom line. Also make marks near the bottom at 1/4”, 1/2”, and a mark near the top at 16 3/8 inches. Now, based on the information provided in the table of offsets, measure out from the center line the appropriate distance and make a mark. For example, at the 1/4” mark on the centerline measure out 2 1/16” and place a mark. At the 1/2” mark on the centerline measure out 2 3/4” and place a mark. At the 1” mark on the centerline measure out 3 5/16” and place a mark. Carry on, until all the marks are made on the paper.
OFFSETS
1/4”........2 1/16”
1/2”........2 3/4”
1”............3 5/16”
2”............3 7/8”
3”............4 1/8”
4”............4 3/16”
5”............4 1/8”
6”............4”
7”............3 13/16”
8”............3 5/8”
9”............3 3/8”
10”..........3 1/16”
11”..........2 3/4”
12”..........2 3/8”
13”..........2”
14”..........1 5/8”
15”..........1 3/16”
16”..........3/4”
16 3/8”...9/16”
As for the angle, well it can be anything from 10 to 14 degrees on average. I did mine at around the 10 mark.
|
|
1974
Full Member
Posts: 131
|
Post by 1974 on Oct 21, 2014 16:57:20 GMT -5
Love the paddle!!
|
|
timbo
Junior Member
Posts: 74
|
Post by timbo on Jan 21, 2015 16:12:48 GMT -5
Well a happy New Year to all of you. I’m afraid I just couldn’t resist the temptation to launch the board after several days of rain which caused some minor flooding in the back yard. It wasn’t very deep so I took the fin off and then, kitted out in all the latest British cold wet marine safety clothing, away I went. It was great fun and I just can’t wait to finish the board in the spring (still needs a coat or two of lacquer to give UV protection) and get out on a real size pond!! Anyway, take care you guys.  |
|
|
|
Post by juliangibraltar on Jan 24, 2015 3:59:26 GMT -5
Glad to see you on it Tim....you're such a fashionista!!!
|
|
timbo
Junior Member
Posts: 74
|
Post by timbo on Jan 25, 2015 8:06:28 GMT -5
Thanks Julian, I guess a board walk is better than a cat walk! I was a bit bored this weekend so surfed a few sites like you do and found this link. www.woodsurfboardsupply.com/TheBooks.htmlPrior to starting last spring and having researched all the posts on this site and many others I finally decided on how I was going to build my board. On the above link there is reference to: ‘WSS Wood Surfboard Kit Instruction Manual - INSTANT DOWNLOAD’. All I can say is that it’s more or less the identical process that I used – If only I had found it earlier! Anyway, I just thought I would share it with everyone – happy paddling. |
|
|
|
Post by jensen1031 on Feb 3, 2015 14:27:47 GMT -5
Glad to see the board in motion. Unfortunately, we are dealing with about 24" of snow here on the east coast of the US. Wind chill has been around -10 degrees.
Ive been getting a lot of good snowboarding in, but I cant stand in my garage longer than 20 minutes at this point.
|
|


