polson
Junior Member

Posts: 78
|
Post by polson on Apr 22, 2012 18:25:15 GMT -5
Here is the re glue. I cut some of the excess bottom skin to hopefully make it more pliable and so the clamp could get to the spar better. I also have given up on the 1 1/2" rail. I will be using the 1" rail and will soak it overnight. I broke one of the 1 1/2" rail and with only so much cedar I figure its better safe than sorry with this expensive of a product. Now my fear is that it comes apart again I'll find out in a few days. Attachments:
|
|
polson
Junior Member
Posts: 78
|
Post by polson on Apr 22, 2012 19:51:31 GMT -5
Alright, went with the 1" rails and after soaking them overnight I tried them. Still very nervous they'll snap. I figured I'll let them set in place for a while then try it again. Any suggestion? Attachments:
|
|
polson
Junior Member
Posts: 78
|
Post by polson on Apr 22, 2012 19:56:12 GMT -5
Okay now what the 1" rail cracked and there is still a good 1"+ to go on the nose? Very frustrating, any ideas would really be appreciated at this point. I soaked this rail overnight, what am I doing wrong? Thanks Attachments:
|
|
|
|
Post by access5 on Apr 22, 2012 20:02:03 GMT -5
I will use 3/4" rail strips and then glue 3/16th Strips to them to build them out .... might result in so interesting patterns... ; )
|
|
polson
Junior Member
Posts: 78
|
Post by polson on Apr 22, 2012 20:12:39 GMT -5
How about building a steamer out of a PVC pipe? Has anyone tried this? Or boiling water into the PVC pipe and letting it sit for an hour?
|
|
|
|
Post by TimelessSurf on Apr 22, 2012 20:39:32 GMT -5
I have used hot water in PVC pipe and it worked well. Remember, the first rail strip is the difficult one, the rest go pretty easily.
You can salvage the strip that split by using spring clamps from the top to pull the split back together along the length (as you glue it in place. once the glue dries dried it will stay and you wont even notice it.
You should be getting a feel for the breaking point of your material now, so next time you bend a strip be cautious and let it rest at it's limit for an hour or so before you try more. Also, you can use the split strips for the last rail strip as long as you have enough length left, a lot of the last strip gets planed away before attaching the top deck. I hope that helps. Keep the faith!!
|
|
|
|
Post by access5 on Apr 22, 2012 23:05:19 GMT -5
Will get the rest of the parts tomorrow, but today I dug out some 4" pvc and a couple of fittings with screw on caps , from the leftovers from building my house....will pick up a hot water heater element, a galv. iron fitting with male and female threads, that the element will fit , a cpvc fitting, for the iron one to fit in and cut a hold into the screw-on cap (thick with big square lug.
Glue the cpvc fitting and when dry screw in the Galv iron one. screw in the heating element and wire to a light dimmer. this will control the heat.... with a thermometer, dial in about 110-120 degrees.
Use a 2 x 6 and cut a 4" hole and make it long enough to be about waist high and nail on a 2 foot section of 2 x 4 for a foot. You have a soaker for wood strips. You can wire in a thermostat form a hot water tank....put this in a outlet box on the 2 x 6.
|
|
polson
Junior Member
Posts: 78
|
Post by polson on Apr 23, 2012 9:14:52 GMT -5
Here is what is was thinking. I don't know if it will work but, take a 3" PVC pipe, place end caps on, drill a small hole in one side and another hole on the other to accommodate a Wagner 705 wall paper steamer. Load some rails steam for 2 hours and try to bend.
|
|
|
|
Post by TimelessSurf on Apr 23, 2012 10:45:23 GMT -5
Down here in Florida I can just paint it black and wait  P.S. I cant tell from the pics above but you should have a board running across the nose to brace the bottom deck (with the clamp) because adding the rail strips will add tension to the deck and possibly split it. Try to keep in on there until you attach the top deck. |
|
|
|
Post by access5 on Apr 24, 2012 16:19:28 GMT -5
Parts for steam chamber....L. to R. 1. heating element 2. cast fitting 3. cpvc reducer 4. coupling .... 5. Whatever the length of your strips-piece of 3 or 4 " pvc 6. coupler w/ threads 7. screw in cap with big lug ( tap and thread center of lug for 1/4" radiator drain fitting )steam vent ....assemble and glue.....used 2 x 6 pine board ...cut 4" hole at top of 3 foot piece( cut inside of line and fit )... use 2 foot of 2 x 4, as foot to keep from falling over. Notch a piece of 2 x 6 and attach with plumber's strap to keep element end off ground. Wire and run to switch and plug....trying to find a thermostat that is plumbed into tube....big coupling is thick enough to tap and thread... Attachments:
|
|
|
|
Post by access5 on Apr 25, 2012 0:22:41 GMT -5
Quick drawing in Paint.... Attachments:
|
|
|
|
Post by vilanobeachsurf on Apr 25, 2012 7:19:23 GMT -5
Looks good, I used a 10' length of 3" PVC with a cap on one end, proped up the other, filled with water and just let it sit.
Sometimes I was bending the 3/4" triangle strips that had been sitting there for a week! And I still got cracks! Chad's suggestion for repair is what I did to keep going. Will see how it worked now that I am ready to start shaping my rails...
But when I put the top deck on, I used wet towels on the top side (wet side grows) and thought it would take a couple of days...Wrong!!! A couple of hours later, the deck was warped perfectly, almost too curved! Go figure!
|
|
|
|
Post by ericden on Apr 25, 2012 12:19:43 GMT -5
I cracked my first rail strip (on my thirid build) so I know how you feel. I usually make all stress bends over the course of several days. Soak deck with a spray bottle clamp until its pretty well stressed and than let sit overnight. Rewet clamp a little tighter and let rest, repeat until it sits at rest within an inch or two of final position. After 3-4 tries its in shape. I did the same with my rail strips on my first boards but last night I got a little too agressive and split one rail. Backed off, rewet two rails and bent with about 4 inches to go. Will redo pool bath and rebend tonight. I'll usually bend four strips at once so progress is not delayed too far but right now I need to cut some more strips.  |
|
|
|
Post by sandlapper on Apr 26, 2012 16:18:42 GMT -5
I've been going over some steps in my mind for my next build and have also been thinking about steam bending. I have made hundreds of music instruments and staem bend all the sides to shape. Most of the smaller instruments I can lightly soak in water and then use a bending iron. Like this. 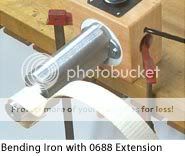 On bigger sides I have used wet cloths and a household iron on top to get them to shape. Once the iron is used on the wet cloth you get instant steam. Another idea I've been toying with is making a mold from plywood in the shape I need at the top and bottom and using light bulbs iside the box to heat up a metal strip on the outside. Guitar makers use this system alot.   Just thought I would throw out some ideas. |
|
|
|
Post by access5 on Apr 26, 2012 17:45:50 GMT -5
You would spend more time building molds than boards.....  It took me 30 minutes to assemble the soak tube ...now to add wire and see if the heater works.. !... ;D |
|


 It took me 30 minutes to assemble the soak tube ...now to add wire and see if the heater works.. !... ;D