|
|
Post by txtommy on Jul 18, 2014 14:56:55 GMT -5
  It's been slow going but a lot of fun. I've only got a good two days out of the week to work on this but I finally got my rocker jig built thanks to inspiration from 1974 posts on his build and the Gallagher surfboard build videoson YouTube . Dropped my spar last night and it cracked all the way through on a cut out rib slot so I will have to cut out and shape another portion of the tail section and then glue on a joint. |
|
|
|
Post by txtommy on Jul 18, 2014 15:02:48 GMT -5
Well I cannot figure out how to attach photos on this site. If anyone can help me out that would be great
|
|
|
|
Post by juliangibraltar on Jul 18, 2014 15:41:40 GMT -5
Hi Tommy, bummer, I've had that happen to me a couple of times but that's the beauty of wood...it can all be fixed! Re the photos, in the top right corner of the post you'll see "Add Attachment", click on that and then find and attach the image, once you click on the chosen image (must be less than 2MB) it will upload (you'll see a green bar fill up) BUT it wont be placed on the post until you press "insert", then it will insert it into the post.,,then you can do this another 2 times, a maximum of 3 images per post.
Hope to see some pics soon!
|
|
|
|
Post by txtommy on Jul 18, 2014 20:02:52 GMT -5
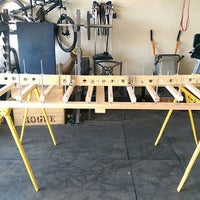 Thanks for the info on the attachments. For some reason it will not give the option of attaching from my android. HAd to wait till I got home to do it on the computer. The wingnuts I got from watching the Gallagher videos really made getting everything leveled out super easy on the jig. I built a more eleborate jig because I know I will be making more boards so I wanted something that initially would take alot more time but in the long run would make other builds alot easier. I am going to end up cutting 2 1/2" wide 1/2" thick plywood planks that will go across the decking and be clamped down to the jig frame to glue the decking and bottom on to the frame. I saw how Gallgher did it in his build videos and it look very simple and effective. I will post pics when I get those cut and set up. 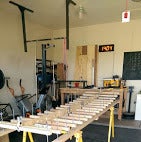 |
|
|
|
Post by txtommy on Jul 21, 2014 8:03:48 GMT -5
Well I got my replacement tail end cut, sanded and glued to the spar yesterday and will unclamp today after work. After reading a lot of posts I knew I would be in for a lot of sanding but after getting all my ribs cut and placed on the spar almost the entire top does not sit flush between the spar and ribs. What's boggling is I did not cut or sand anywhere near the disparity I've encountered then from the blue prints that I had printed off at the local Fed Ex store. Oh well I will take all the time in the world to make sure the ribs and Spar are flush so the rest of the project does not get worse. My plan is to glue the ribs onto the spar with the bottom flush making sure ribs are as square as I can get them to the spar and then after dry I will sand the spar down on the top down to where it is flush with the ribs. If anyone has had a better option with their build let me know. Thanks guys
|
|
|
|
Post by juliangibraltar on Jul 21, 2014 8:23:24 GMT -5
Tommy, if the bottom of your ribs are straight then you might find it easier to glue the ribs flush with the top of the spar (as the top of the ribs are curved) and then add some extra wood against the bottom of the ribs which you can then sand down flush with the Spar.
Generally I would sand/plane the ribs rather than the spar as when you sand the spar you will possibly break the rib when you come up against it as it is only 4mm wood (as opposed to the spar which is around 12-15mm). Not sure if thats clear...unfortunately i don't have photos on me at present.
|
|
|
|
Post by txtommy on Jul 21, 2014 9:02:11 GMT -5
Thanks for the info Julian. That would be easier.
|
|


