josht
New Member

Posts: 31
|
Post by josht on Aug 16, 2012 18:38:16 GMT -5
OK, I began my journey to a new paddle board. There were a couple snafu's, but nothing horrendous. Let the games begin! Attachments:
|
|
josht
New Member
Posts: 31
|
Post by josht on Aug 16, 2012 18:39:34 GMT -5
Here is my joint of the spine, i cut it at an angle as shown in the instructions and glued a thin piece of the plywood on each side. Attachments:
|
|
josht
New Member
Posts: 31
|
Post by josht on Aug 16, 2012 18:40:27 GMT -5
Ready to trace out my ribs! Attachments:
|
|
josht
New Member
Posts: 31
|
Post by josht on Aug 16, 2012 18:44:30 GMT -5
Here are the hardwood dowels I put into the join to add strength. Attachments:
|
|
josht
New Member
Posts: 31
|
Post by josht on Aug 16, 2012 18:45:37 GMT -5
The jig is done, and the spine is all shimmed up. Attachments:
|
|
josht
New Member
Posts: 31
|
Post by josht on Aug 16, 2012 18:46:37 GMT -5
All of the ribs fit nicely! one of the ribs broke on me when I treid to insert it, so i had to cut out another. No big deal. Attachments:
|
|
josht
New Member
Posts: 31
|
Post by josht on Aug 16, 2012 18:47:30 GMT -5
The spine and ribs are all sanded flush and the strips for the skin are cut. Ready to glue up, more pics to come! Attachments: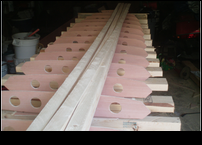
|
|
|
|
Post by access5 on Aug 16, 2012 19:35:11 GMT -5
Josht .... try this for joins ...overlap the joins and draw a inter-locking pattern and cut it across with a jig or coping saw and the panels will inter lock ....coat the edges of both joins with epoxy and press inter-locking joins together...... use a patch of fiberglass tape to bond joints...a lot neater than the plywood backing plates....
|
|
josht
New Member
Posts: 31
|
Post by josht on Aug 16, 2012 22:35:24 GMT -5
Thanks access, appreciate the tip. Ill remember that on my next project  |
|
|
|
Post by vilanobeachsurf on Aug 17, 2012 5:36:16 GMT -5
Looking good josht! What kind of wood will you be using for the decks?
|
|
josht
New Member
Posts: 31
|
Post by josht on Aug 17, 2012 9:58:00 GMT -5
I decided to try some pine for the decks. So far its looking like it will have a lot of character, so I'm pretty excited.
|
|
|
|
Post by access5 on Aug 17, 2012 10:04:31 GMT -5
As soon as I get home, I will post a how-to,with pics.....
|
|
josht
New Member
Posts: 31
|
Post by josht on Sept 22, 2015 22:36:15 GMT -5
So, I took a 3 year hiatus on this project to go to school and work. I had some free time this summer, so I decided to finish up my board!  |
|
josht
New Member
Posts: 31
|
Post by josht on Sept 22, 2015 22:37:27 GMT -5
Here are the rails being added.  |
|
josht
New Member
Posts: 31
|
Post by josht on Sept 22, 2015 22:39:45 GMT -5
Here the rails are planed flat, the nose and tail blocks are glued on and the reinforcements for the handle, tail block and leash plug are glued in.  |
|


